Secure Access Using SAML, OAuth and OIDC
Does your organization use a single sign-on solution? Do you need to hook into it? Or maybe you want to allow your users to sign on with their Google login? Heck, even if you want a mechanism for securing your own API… Chances are, you’ve at least heard of SAML, OAuth and OpenID Connect (OIDC). If you want to learn more about these technologies, then you’ve come to the right place.

Image by Elena Nelyubina on iStock by Getty Images
Authentication vs Authorization
SAML, OAuth and OIDC are all protocols for secure delegated authorization. However, SAML and OIDC also account for authentication. So, what’s the difference?
Put simply, authorization is concerned with what a user can do, whereas authentication is concerned with answering the question, “Is the user who he or she claims to be?” Let’s talk through a simple example, like logging into GitHub.
The first thing that happens when a user logs into GitHub is they enter a username and password. Once that username and password is entered and the Sign In button is clicked, the user is authenticated. The username, combined with the password determines who the user is. The user claims who they are via the username and they provide evidence to that claim by supplying a password. If the username is registered and the password matches the password associated with that username in GitHub then that user is authenticated.
However, just because a user can log into GitHub, it doesn’t mean they can do whatever they want. That’s where authorization comes in. The user is given certain permissions: to the repositories they own, to their organizations, to the repositories in which they contribute, etc. Those permissions have to be known while the user is interacting with GitHub and without that user having to re-authenticate (i.e. re-log in) on every action. That’s what SAML, OAuth and OIDC do. They “authorize” what a user can do by making verifyable assertions (or claims) about that user.
SAML
SAML, or Security Association Markup Language has been around for a long time (almost 20 years); it predates both OAuth and OIDC. It’s also XML-based, which makes it less terse than other protocols. However, it still enjoys pretty wide use today. For that reason, it is still very relevant.

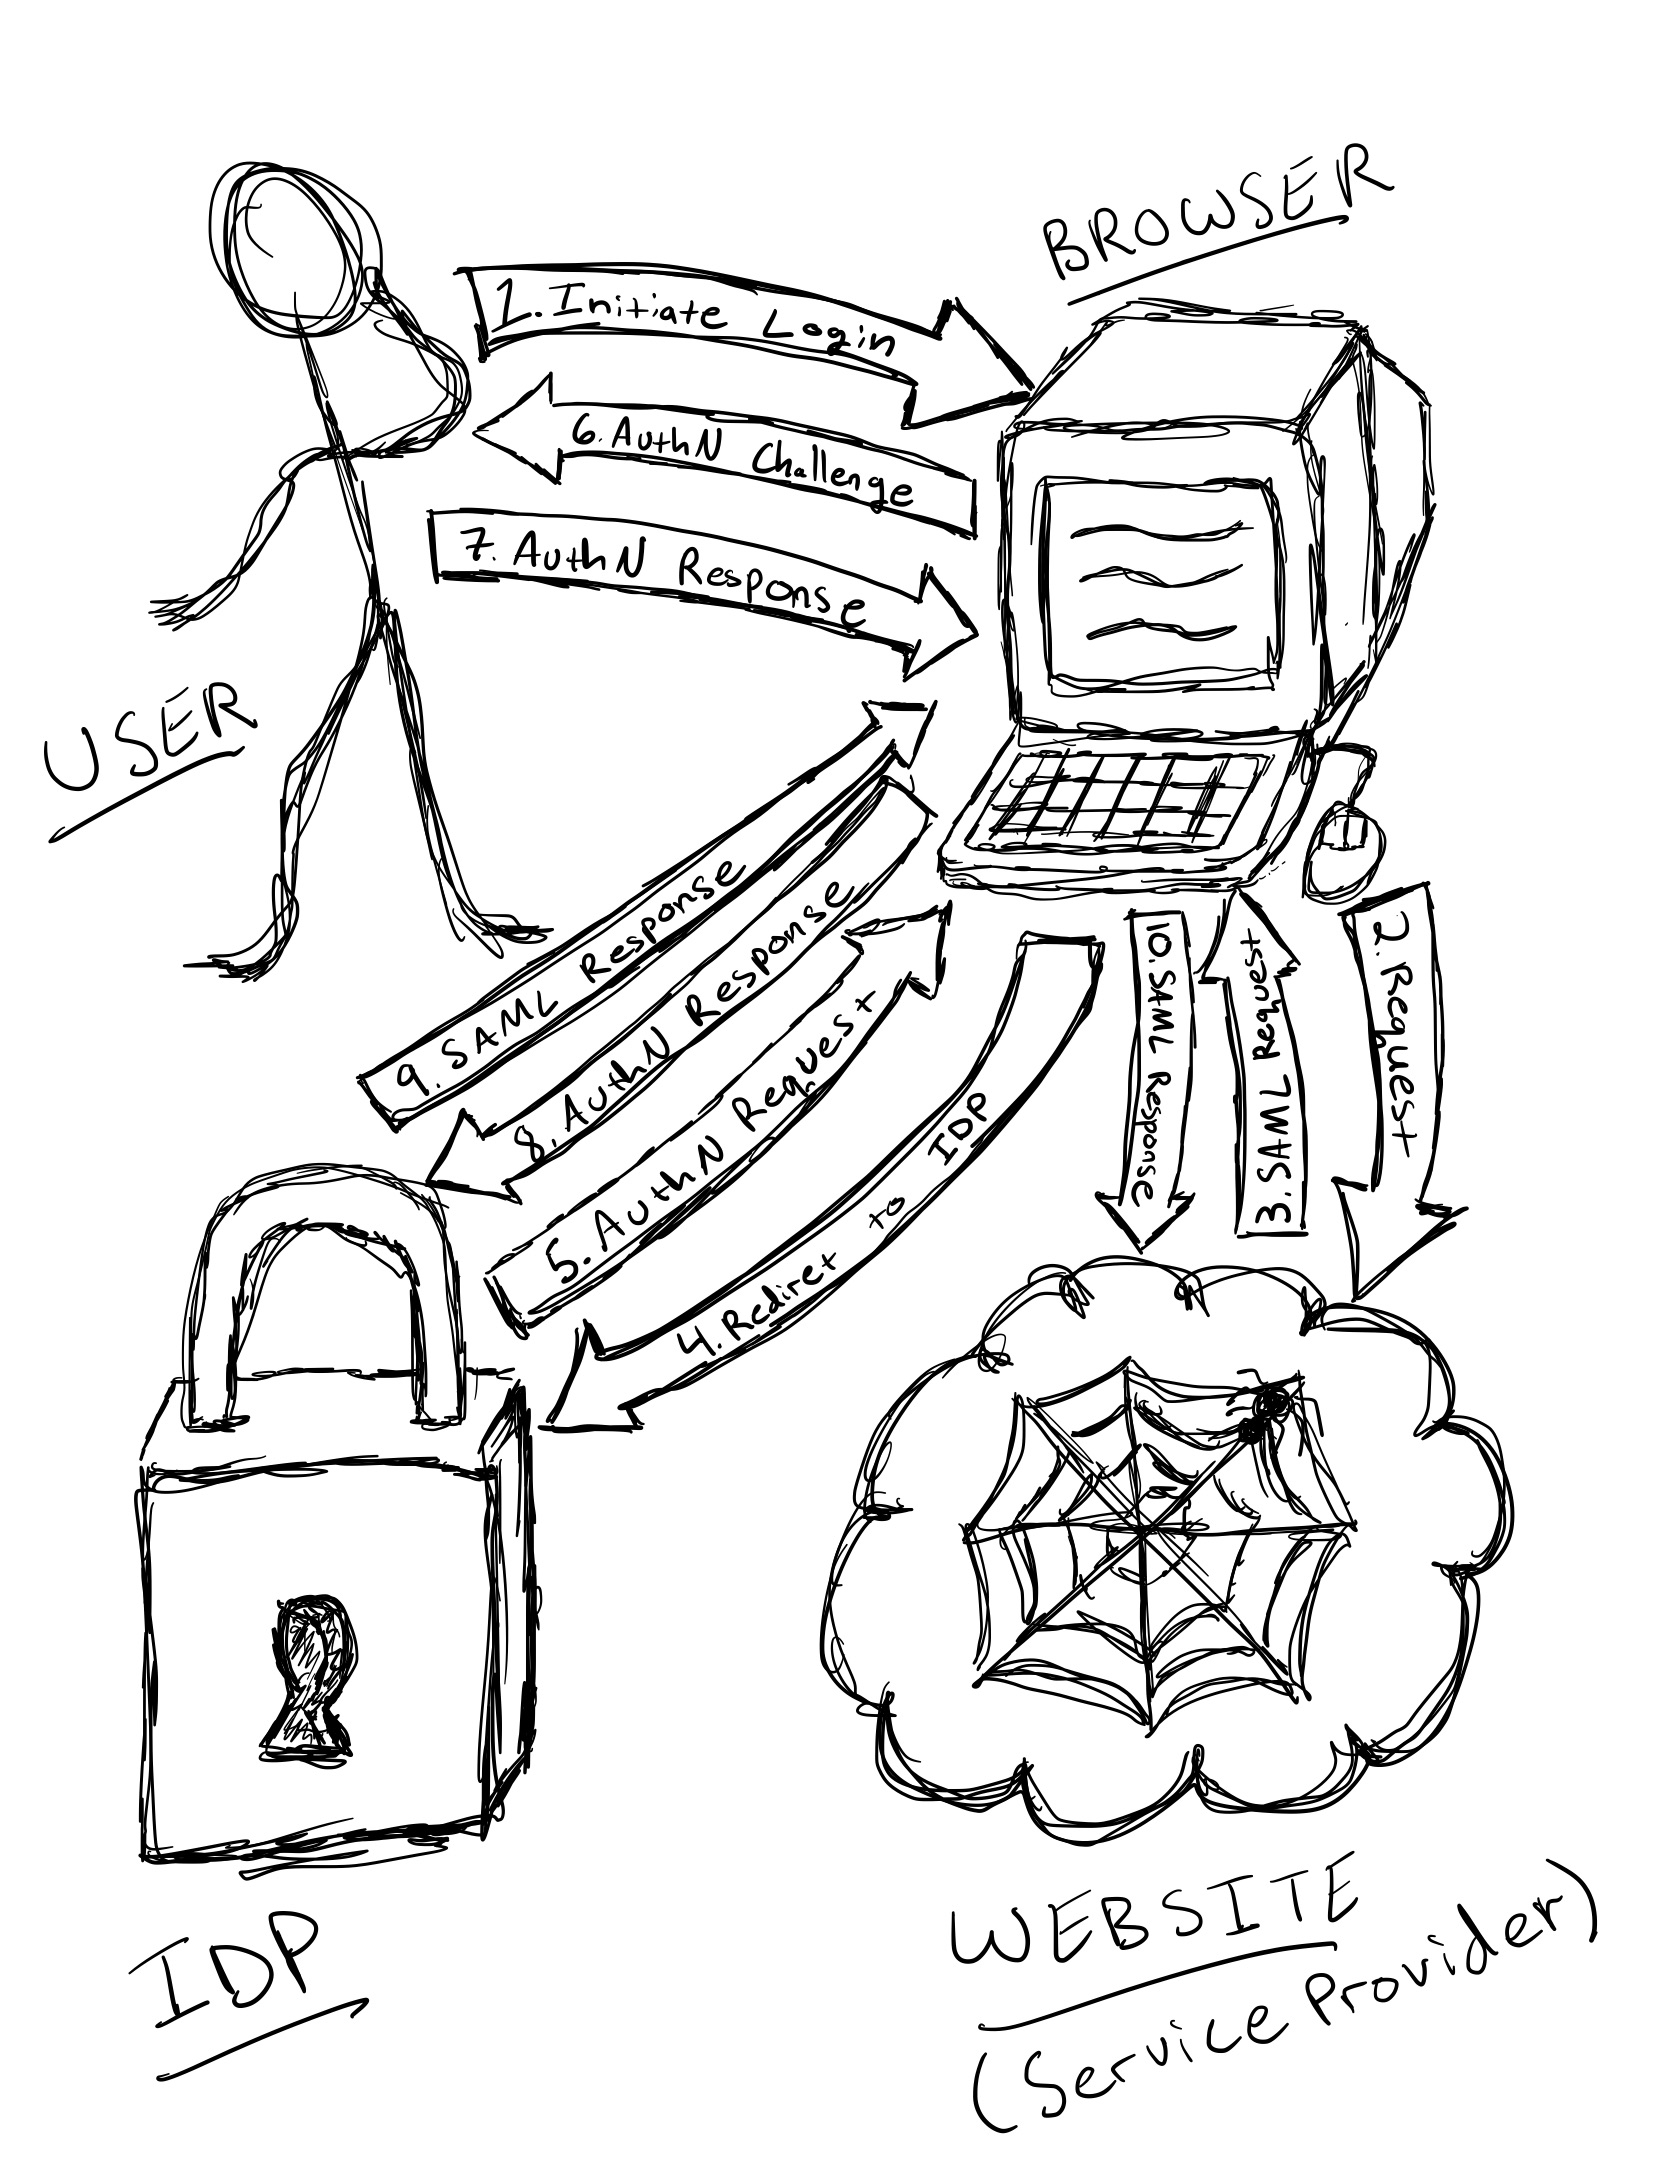
SAML Web Flow
The image above depicts a typical SAML Web Flow. The sequence is as follows.
- User initiates a log-in
- Their request is directed to the Website
- The Website responds with a SAML challenge request that includes the trusted IdP’s (Identity Provider’s) location
- The user’s browser is redirected to the trusted IdP for authentication
- The IdP makes a authentication request to the browser
- The user is prompted to respond with their authentication details (e.g. username and password)
- The user responds with their authentication details
- The user’s response is sent to the trusted IdP
- If authenticated, the IdP responds with a SAML response that has assertions about that user (details about the user, what they do, etc.)
- The SAML response is then forwarded back to the website, which validates its authenticity and uses the included assertions to provide the user appropriate access
Now, that seems like a very arduous process. But in practice, all of those steps take place within a few seconds. The important thing to note here is that the IdP is not part of the website (although, it could be) and it’s the IdP that does the authentication. Once the authentication is complete, the SAML response can then be used to authorize the user based on the assertions in the request.
At this point, you might be scratching your head and thinking, “How can the Website just blindly trust the assertions in the SAML response?” The answer is that there must be a lot of trust between the IdP and the Website: the Website must be able to know with certainty that the response originated from a trusted IdP and the Website must also be able to know that the SAML response was not tampered with.
Fortunately, the assurances that the Website requires can be provided through certificates. The IdP signs the SAML response with a private key that only it has. The Website can then use a public key to validate that signature, which can simulatneously verify the signer of the SAML response and the integrity of its contents. If someone where to hijack a SAML request and change its contents then the modified SAML response would not have a valid signature since the hijacker would not have the IdP’s private key, which is needed to sign the response for the Website’s signature validation.
Without encrypting the SAML response, it might still be possible for a nefarious actor to view the contents of that response. They just couldn’t modify it. So, truly secret information like social security numbers, bank information and credit card numbers are not good candidates for SAML assertions.
With that being said, the entire SAML response could be encrypted. However, that comes with its own costs, such as increased computational complexity (and the associated time delay). Regardless, SAML assertions are still not a great place to be passing around social security numbers and the like, even if the Website and the IdP are owned by the same entity.
OAuth
OAuth was released after SAML. It was drafted in 2007 and its first release was in 2010. OAuth1 has been almost completely eclipsed by OAuth2 and OIDC due to security vulnerabilities and a lack of consistency across implementations. Therefore, we will focus on OAuth2 in this section. For the remainder of this post, when we mention OAuth, we are referring to OAuth2.

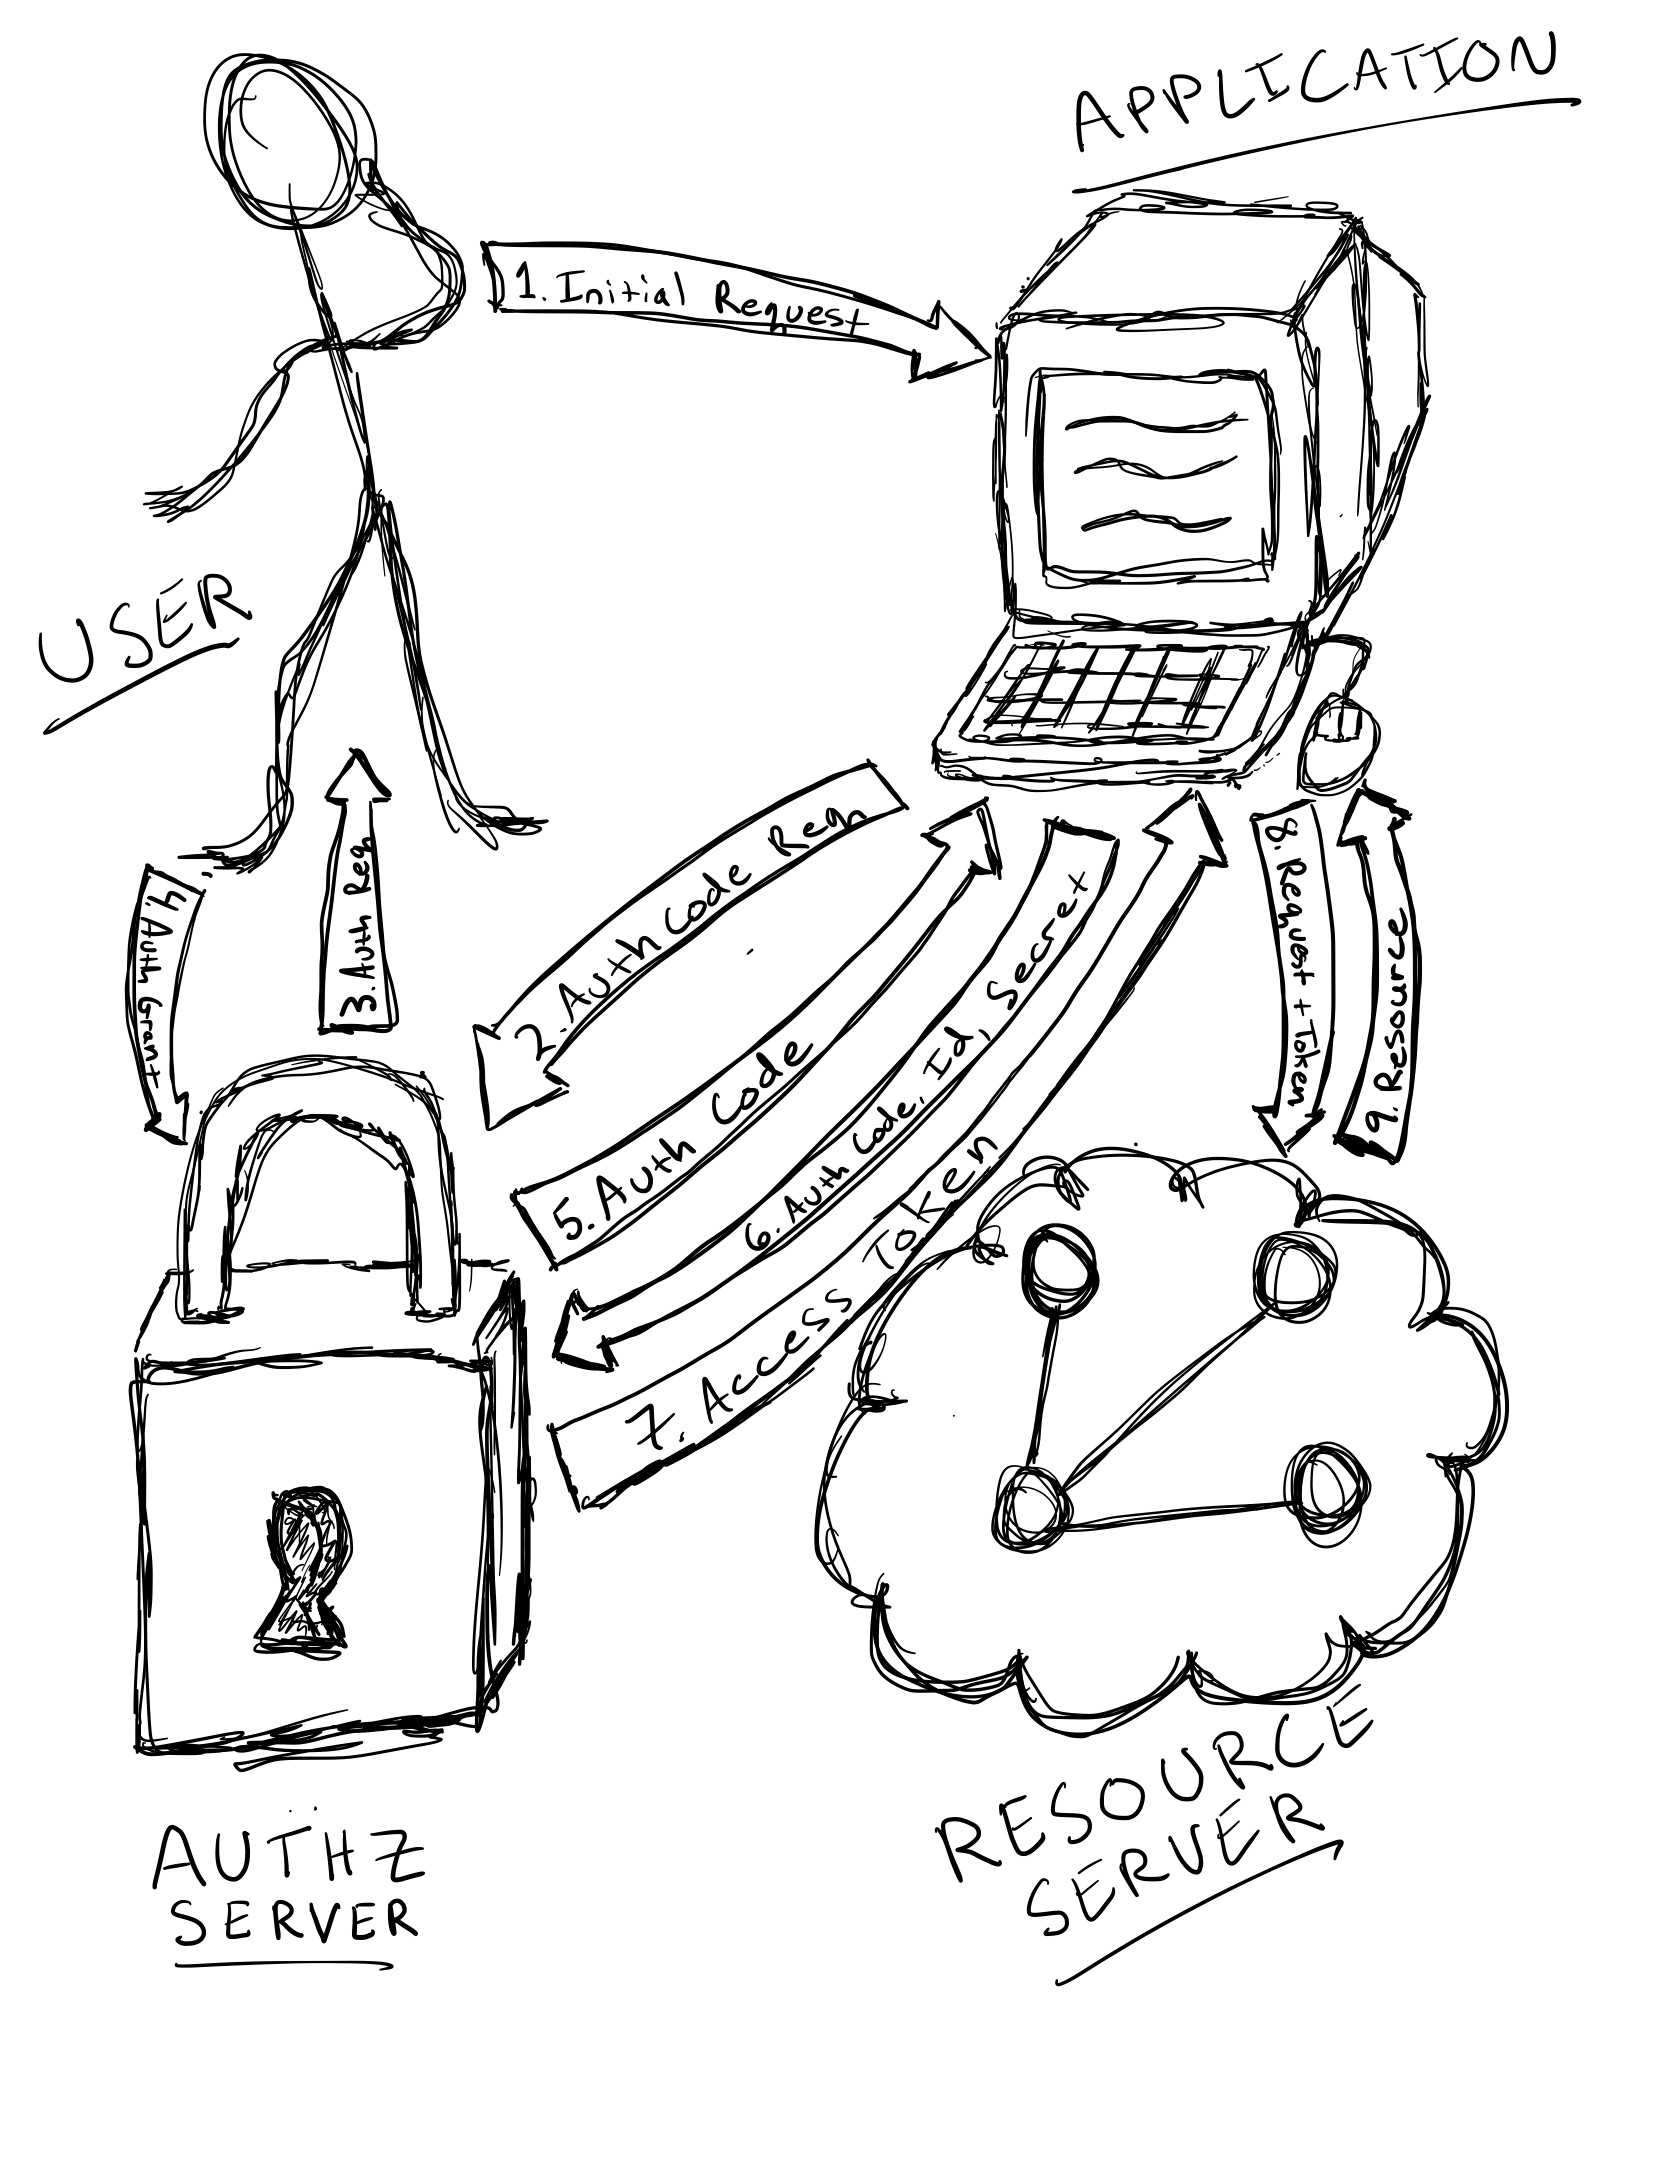
3 Legged OAuth Flow
The image above depicts a 3 Legged OAuth Flow. The sequence is as follows.
- The user makes a request that triggers the Application to request authorization for resources
- The Application makes an authorization code request to the Authorization Server
- The user is prompted to grant authorization
- The user grants authorization to the Application via the Authorization Server
- The Authorization Server issues an authorization code to the Application
- The Application requests an access token by providing the authorization code, its and its secret to the Authorization Server
- The Application is issued an access token by the Authorization Server
- The Application can then provide the access token with its resource requests to the Resource Server
- The Resource Server validates the access token provided by the Application and if valid, it authorizes resources to the Application
If you’ve ever given other applications access to your Facebook or Google accounts, the above flow probably makes a lot of sense. Well, that’s because this is how it’s done!
You’ll notice one significant omission from this flow when compared to the SAML Web Flow (above). That’s right! There is no mention of an IdP! That’s because while SAML’s protocol provides for both authentication and authorization, OAuth is concerned only with authorization.
2 Legged OAuth Flow
If you’ve heard about OAuth before then you’ve probably heard both 3 Legged OAuth Flow and 2 Legged OAuth Flow mentioned. So, what’s the difference? Well, 2 Legged OAuth Flow omits the user; it’s used for non-user specific resource access. Now, you might be thinking, “Wouldn’t that just be public API access?” Not exactly.
Two Legged OAuth Flow provides a higher level of trust than public/anonymous access. So, a trusted application could have a higher level of access than a public/anonymous application, which might not be granted any access. Consider a scenario involving two disparate in-house systems, where one system needs resources that another system provides. Those resources might not be (are probably not) public. But, because there is a trust established between those systems using OAuth, the resource provider knows that it’s safe to provide access to specific resources required by the requesting application.
As you probably gathered, there is a lot going on with OAuth. If you want to learn even more about OAuth, here are some great links.
OIDC (OpenID Connect)
OpenID Connect was first published in 2014. So, it’s the newest of the aforementioned technologies. OpenID Connect extends OAuth2, by filling in some of its holes, specifically accounting for authentication and the standardization of a “new” ID (JWT) token.
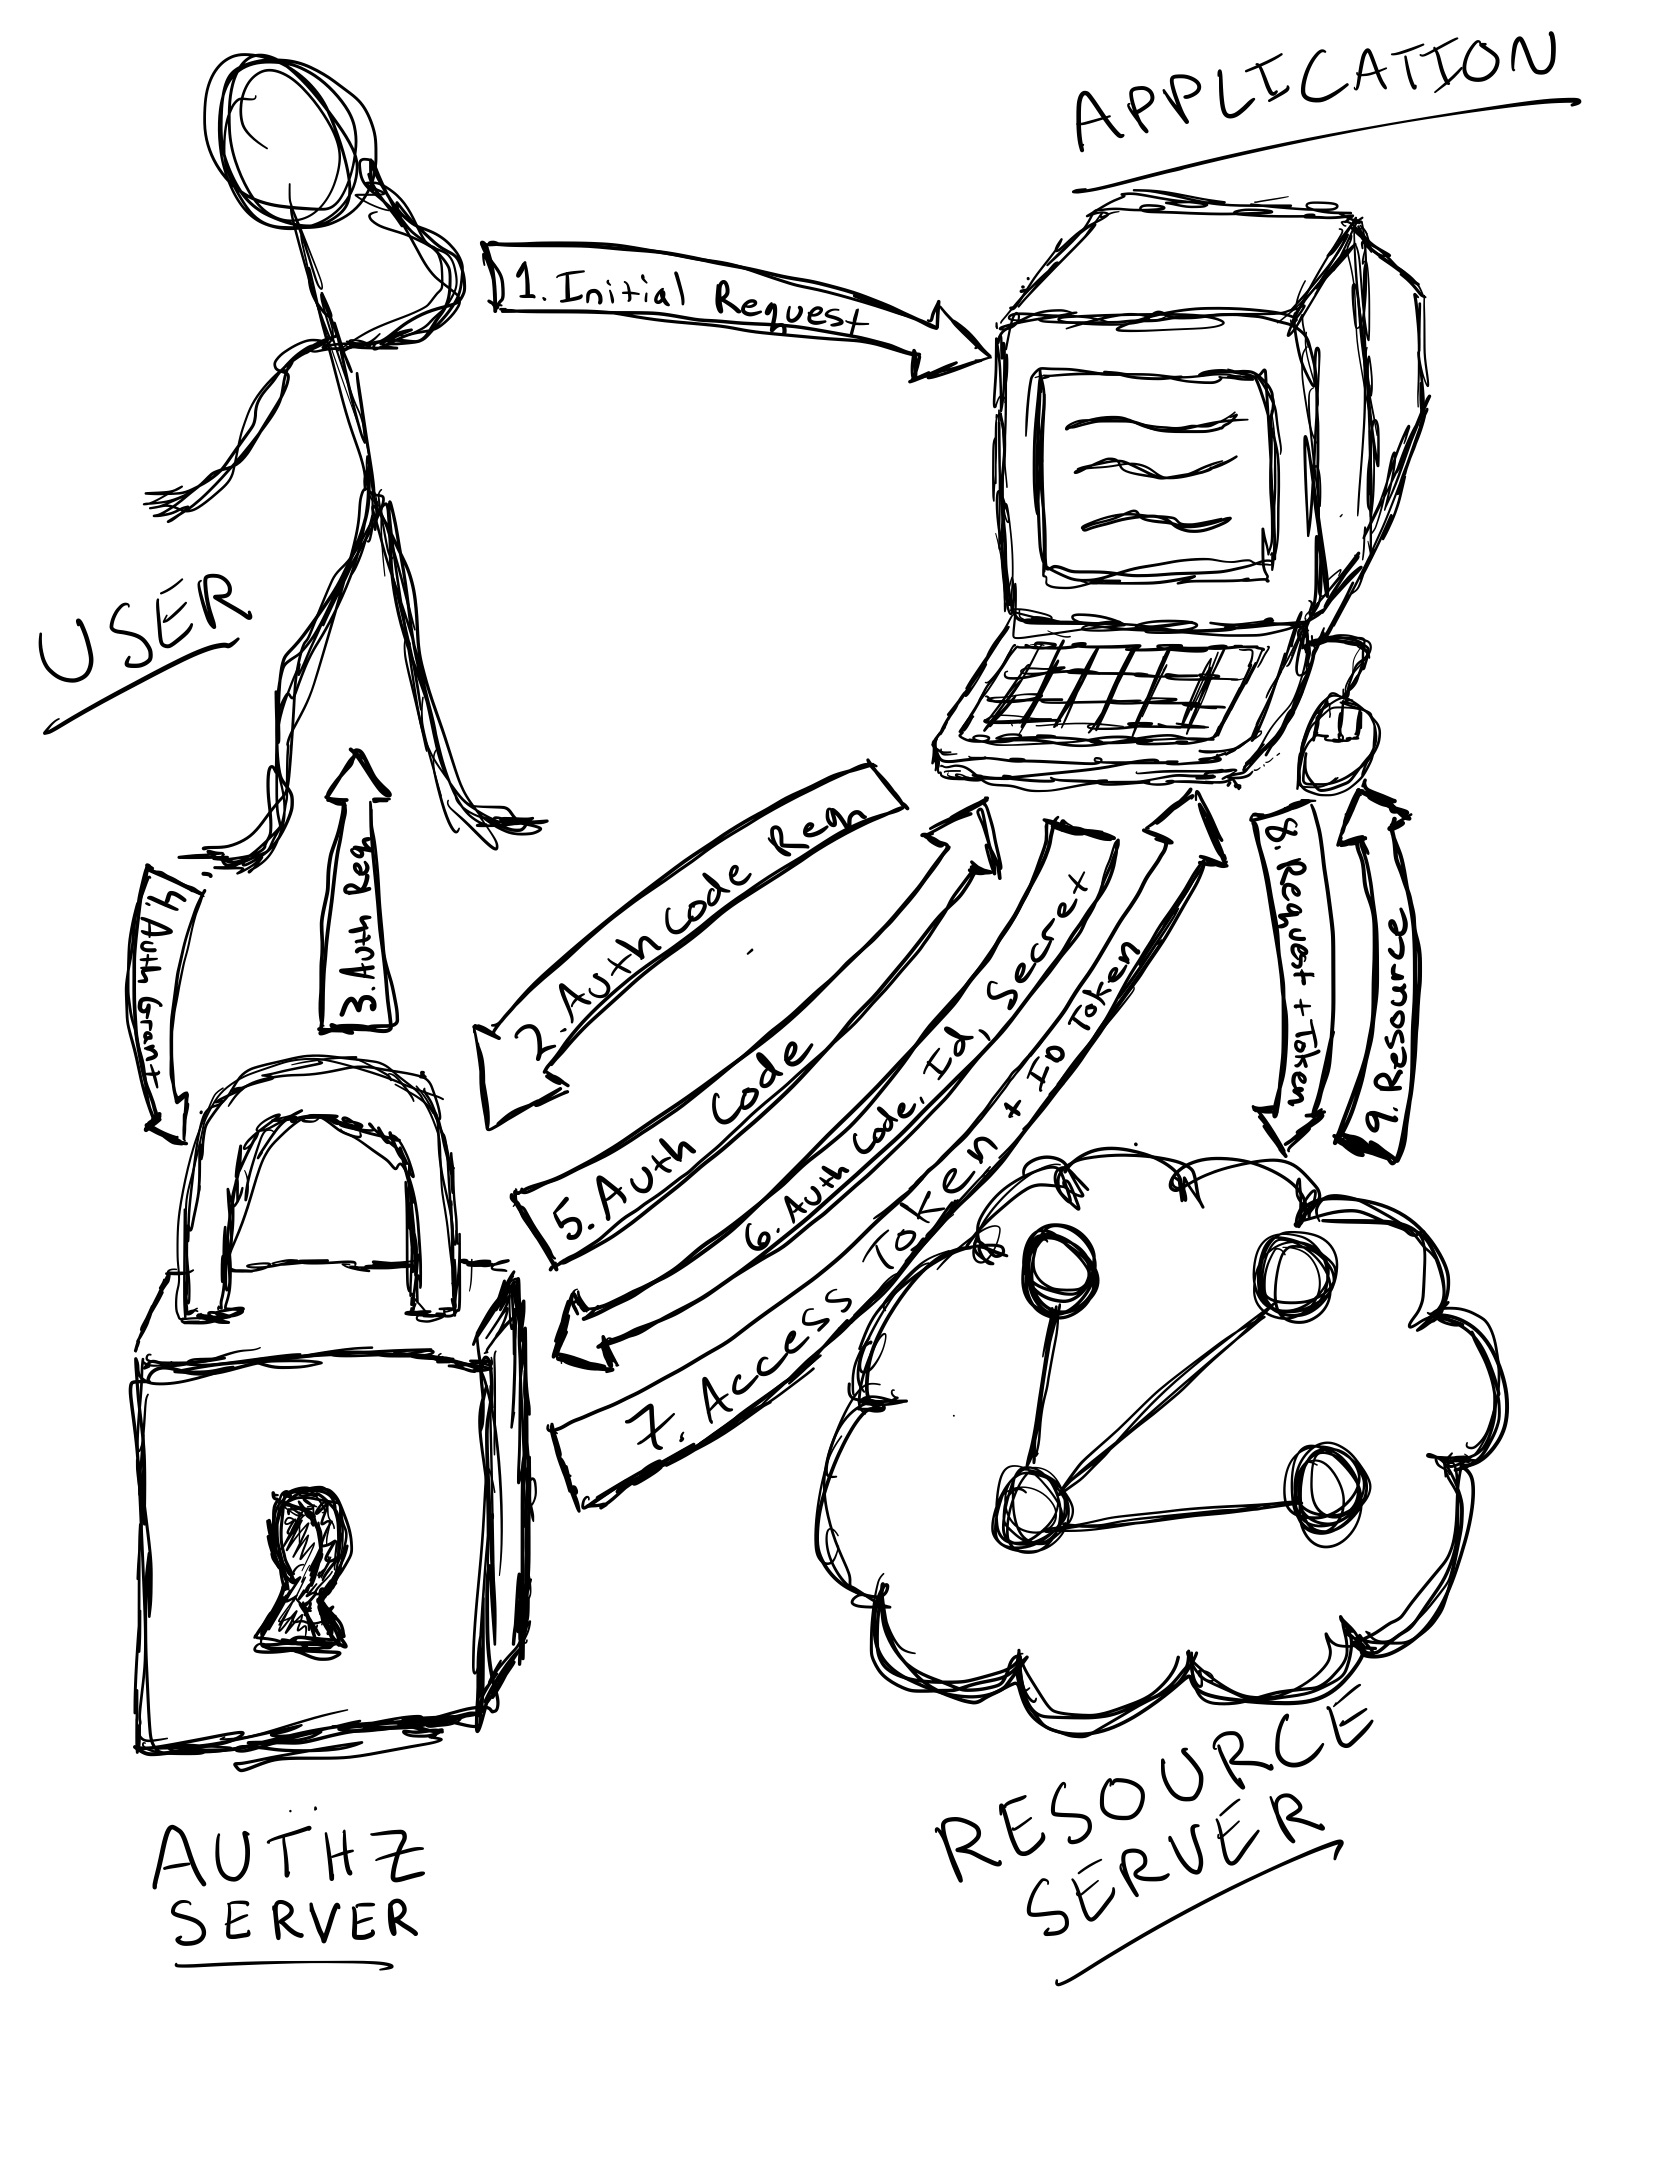
The flow for OAuth detailed above is pretty similar to the Authorization Code Flow for OIDC, as is its approach to using tokens for authorization. Let’s talk though the OIDC Authorization Code Flow in more detail.

OIDC Authorization Code Flow
- The user makes a request that triggers the Application to request authorization for resources
- The Application makes an authorization code request to the Authorization Server
- The user is prompted to grant authorization
- The user grants authorization to the Application via the Authorization Server
- The Authorization Server issues an authorization code to the Application
- The Application requests an access token by providing the authorization code, its and its secret to the Authorization Server
- The Application is issued an access token and an ID token by the Authorization Server
- The Application can then provide the access token with its resource requests to the Resource Server
- The Resource Server validates the access token provided by the Application and if valid, it authorizes resources to the Application
You may be wondering, “How does this improve upon OAuth?” It could certainly be argued that the use of JWT for the ID token alone is a significant improvement. JWT’s are easily decipherable as they are themselves, JavaScript. So, they can (and often do) include additional information about the user, like their full name, avatar, email, etc. That alone, can be super helpful. But more than that, OIDC defines a standard that not only specifies a common format and protocol for authorization, it also factors in authentication. All of these things make it easier to use, [a little] less chatty and more interoperable.
If you’re interested in learning more about OIDC, here’s a link to the specification.


