Getting Started With Kubernetes
If you have heard of DevOps then you have probably also heard of Kubernetes. But what is Kubernetes? Why is it important and how can you get started with it? Read on to find out.
Image by Jaiz Anuar on iStock by Getty Images
What is Kubernetes?
Kubernetes, also known as K8s, is an open-source system for automating deployment, scaling, and management of containerized applications.
That answers the question “What is Kubernetes?” But why is it important? To answer that question, let’s talk through a fictitious online pet store software system.
Why Is Kubernetes Important?
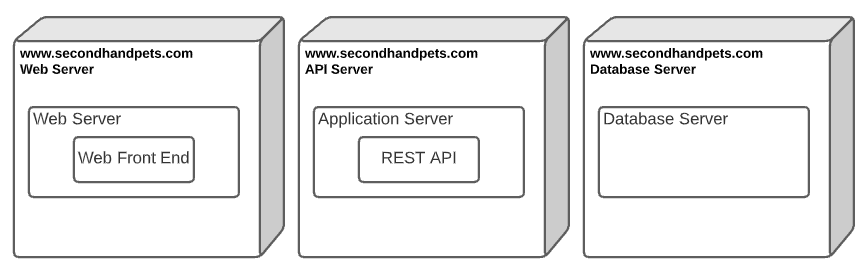
www.secondhandpets.com is an online pet store that specializes in re-homing pets who have been abandoned or who’s owners can not longer care of them. Their (relatively simple) online store consists of a database, a REST API and a Web front-end. In the olden days, all of its components might have been collocated on a single server and just run as separate applications.
But, collocating all of the system’s components on a single server (or a cluster) creates some problems. First off, if that server is compromised then the application server hosting the REST API, the database, its data and any secrets kept locally with the application might also be compromised. Additionally, updating just a portion of the application can impact all of its components and none of its parts can scale independently.
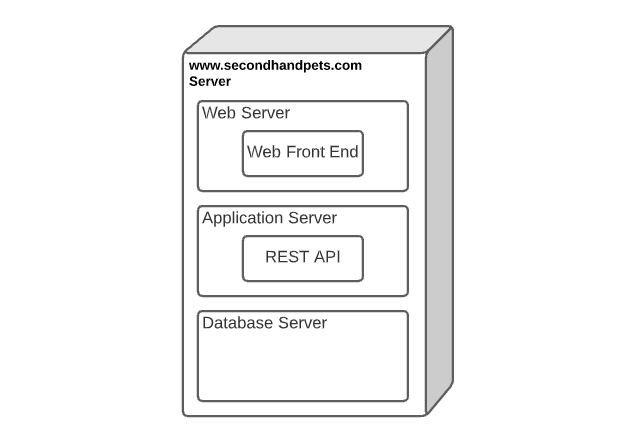
Collocated System Components
Recognizing that cramming everything onto a single collocated space is probably not a great solution, one might conclude that each component should be broken up onto its own server or server cluster. This too carries with it some problems. Now, there are multiple servers to manage and of course, application deployments just got a lot more complicated. But hey, at least now different parts of the application can scale independently and the database server doesn’t have any exposure to the Internet.
Physically Distributed Components
Eventually, some superstar developer says, “why don’t we use Docker?” Now, each component can be published as a Docker image, and run in its own container (but probably still on different servers). This alleviates some of the maintenance burden on the servers since now they are now just platforms on which to run Docker images. But that doesn’t fix the deployment complexities. And what happens when one component needs to be scaled up or if a Docker container fails?
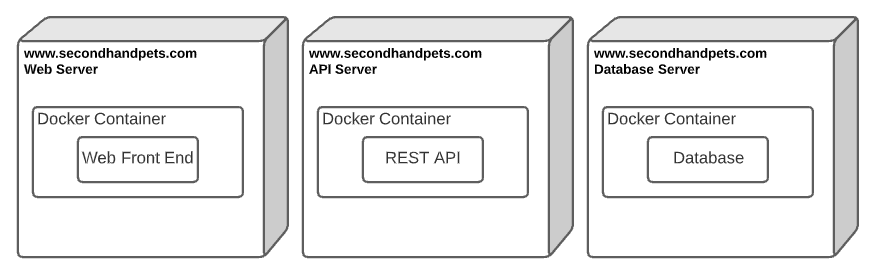
Containerized Components
Wouldn’t it be great if there was a solution that let us use a single cluster of servers to deploy the different online pet store system components? Wouldn’t it also be great if that solution managed each component independently (networking/security, scaling, deployments)? What if that same solution could be used by a developer to run the entire system locally, too? Kubernetes is such a solution.
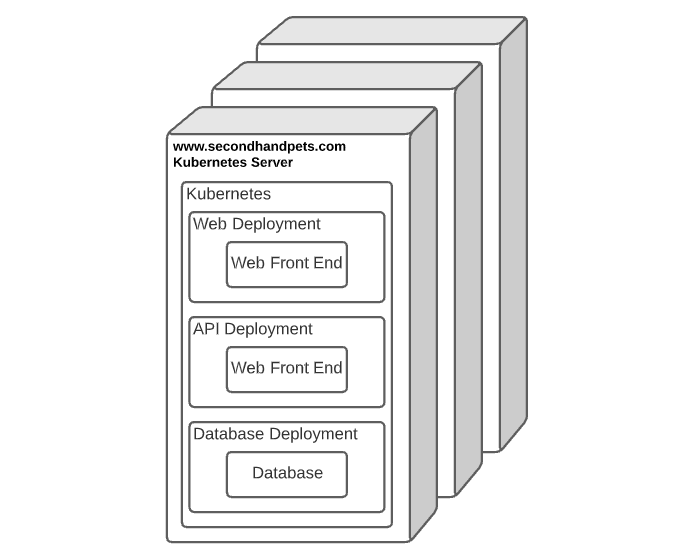
Kubernetes Logical Component Deployment
Some Kubernetes Basic Concepts
Pods
Docker containers in Kubernetes run in Pods. In many cases, Pods run a single long-lived container (e.g. a Web server or a database). However, that’s not always true. Pods can host multiple containers.
Jobs
Jobs also run containers. However, unlike with Pods, containers in Jobs are expected to terminate. A batch job might be a good thing to run in a Kubernetes Job.
Services
Services are a networking abstraction for a group of Pods. For example, a database deployment consisting of multiple Pods, each with its own database container might be exposed through a service that provides a fixed point of entry into that Deployment. This is important because Kubernetes assigns IP addresses to Pods, and a Pod may be replaced. So, instead of addressing Pods directly, it’s a pretty common practice to address a Service that is responsible for providing communication to the underling Pods.
Deployments
A Deployment is a group of Pods that can be managed together. Deployments allow us to define a single Pod specification that can be used to deploy, scale, undeploy and access Pods as a group. For example, let’s say we wanted to replace an existing Deployment with a new Deployment of the same type because there was an update to the Docker image. Instead of tearing down all the Pods and then creating new pods, we could do a (zero-downtime) rolling update using the Deployment. The best part is, that functionality is available out of the box with Kubernetes Deployments.
ConfigMaps
ConfigMaps are like shared properties sets or environment variables managed within Kubernetes. In fact, ConfigMaps can actually be mapped to container environment variables.
Secrets
Secrets are well, secrets that are managed by Kubernetes. They function kind of like ConfigMaps. But, unlike ConfigMaps, Secrets are specifically meant for storing sensitive information.
There’s a ton more to Kubernetes than just the basic concepts identified above. If you want to learn more, check out the official Kubernetes docs.
Installing Kubernetes
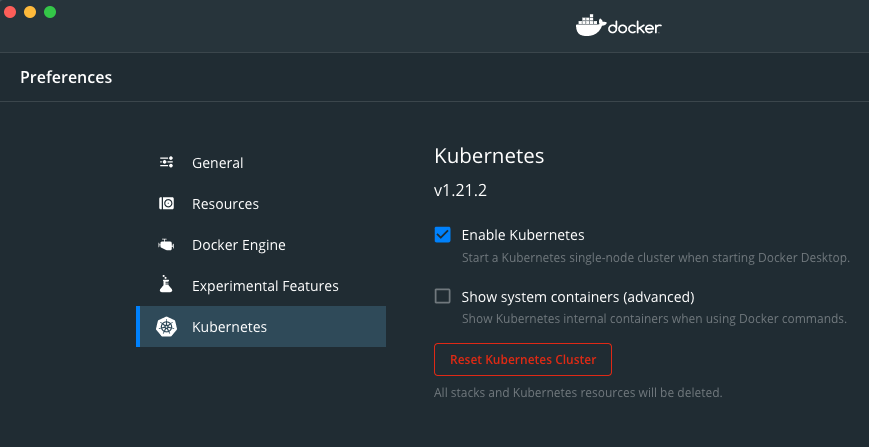
The Docker Desktop is probably the easiest way to get started with Kubernetes. Kubernetes comes packaged with The Docker Desktop. So, once The Docker Desktop is installed, just select Enable Kubernetes in The Docker Desktop config/preferences.
Installing Helm
Multiple posts could be written on Helm (we’ll probably have a dedicated Helm post or two at some point). So, we’re not going to get into the particulars of Helm except to say that Helm is a commonly used orchestrator and package manager for Kubernetes. If you’re familiar with NPM or Gradle, then you get the idea. Helm is kind of like the NPM of Kubernetes.
Installing Helm is pretty trivial; just use your favorite package manager for your OS.
Here’s how to install it using Homebrew.
brew install helm
Deploying Prometheus
Prometheus is commonly used for gathering and monitoring metrics for Kubernetes. It provides CPU & memory usage out of the box. Network usage, web requests and other metrics can also be targeted. When Kubernetes Deployments need to scale up because of high resource utilization, Prometheus can be the mechanism to provide that trigger based on the metrics it continuously monitors.
Prometheus is an open-source systems monitoring and alerting toolkit originally built at SoundCloud.
Prometheus metrics are supported by Lens, a Kubernetes UI that makes the Kubernetes Dashboard look like a child’s toy. So, without further delay, let’s deploy Prometheus, and then we can use Lens to visualize the metrics provided by Prometheus.
1. Create a values.yaml
Properties in Helm can either be set as arguments when calling the Helm CLI or they can be set in a YAML file. Let’s set our Prometheus Helm Chart properties in a values.yaml file as follows.
server:
  global:
    scrape_interval: 30s
prometheus-node-exporter:
  hostRootFsMount: false
The first value, scrape_interval: 30s is set at 30s so that Lens can get regular metrics updates. The second value,
hostRootFsMount: false is set due to a bug/glitch in Prometheus.
2. Install Prometheus Using Helm
Prometheus has a published Helm chart that we can use to install Prometheus in Kubernetes. However, in order to use that chart, we need to add the repository to our local Helm installation. We can do that with this command.
helm repo add prometheus-community https://prometheus-community.github.io/helm-charts && helm repo update
Once the repository is added, we can deploy Prometheus using Helm as follows.
helm upgrade -i prometheus prometheus-community/kube-prometheus-stack -f values.yaml
Install & Configure Lens
As was mentioned before, Kubernetes does have an available Web dashboard, appropriately named The Kubernetes Dashboard.
The Kubernetes Dashboard puts a Web UI on top of Kubernetes that can only be classified as “not bad.” However, there are some
drawbacks. First and foremost, The Kubernetes Dashboard is a deployment that runs inside of Kubernetes and accessing it
means either using kubectl proxy or exposing it through a service (or an ingress). Second, it’s pretty limited, especially
when compared to Lens, which allows you to connect to multiple Kubernetes installations, execute kubectl commands graphically,
have integrated terminal access, and more. Also, Lens is a standalone application that does not require another
Kubernetes Deployment, which also means no kubectl proxy or service is needed to use Lens.
1. Install Lens
Installing Lens is pretty simple. Just download it from k8slens.dev and install it like any packaged application (because that’s what it is).
2. Configure Lens to Use Prometheus
Open up Lens, click on Catalog, find docker-desktop Kubernetes cluster, click the meatballs/quick-action to the right of it and select Settings.

In the Settings for docker-desktop, select Metrics and then select Prometheus Operator from the Metrics dropdown.
3. Restart Lens
After you selected Prometheus Operator for Metrics and restarted Lens, you should be able to see metrics in Lens. And of course, those metrics would be coming from Prometheus.
You can navigate to those metrics in Lens by clicking on Catalog, clicking the meatballs to the right docker-desktop and selecting Connect.
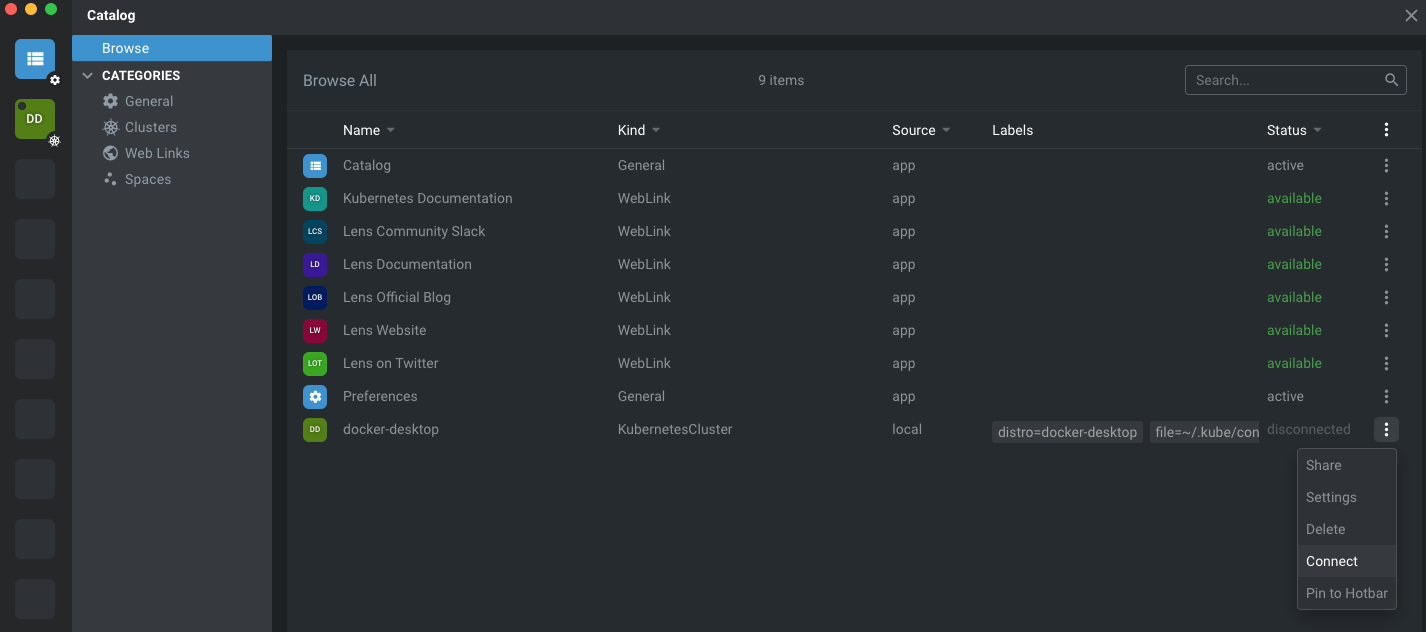
Once docker-desktop is connected in Lens, click on the meatballs again and select Pin to Hotbar. docker-desktop should now show up as a box on the left side of Lens.
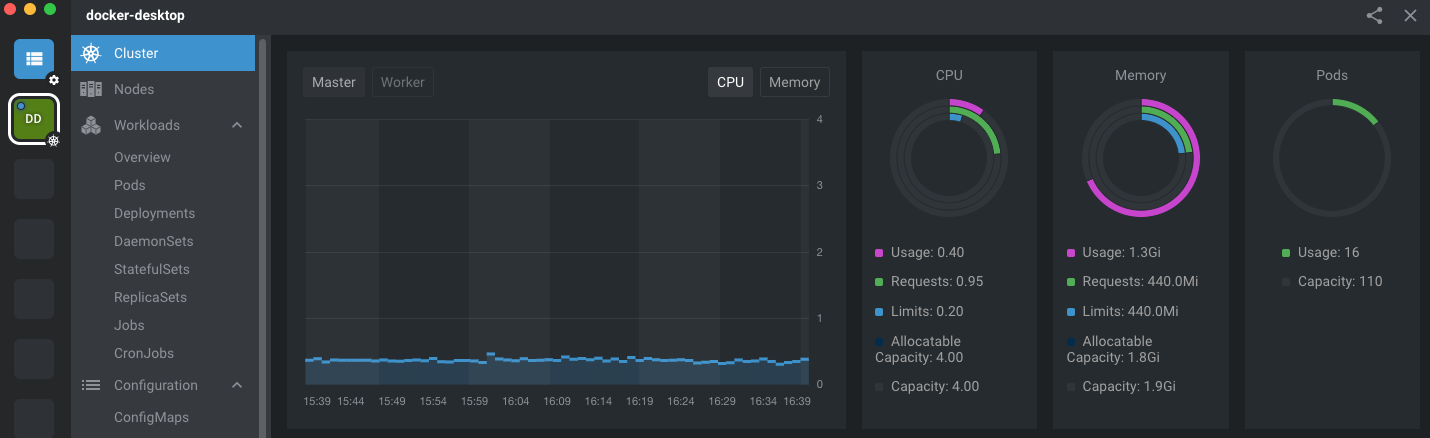
Select the docker-desktop box on the left side of Lens and voila! Metrics!
Summary
In this post, we talked about…